Lemon-Blueberry Bread to Fight the Winter Blues

It’s been particularly rainy, cold, and windy here in the Bay Area. Normally this doesn’t bother me, as I love fall and winter and relish in this weather. However, this year I wouldn’t mind speeding up the process a bit as the thought of spring and summer sound exceptionally wonderful.

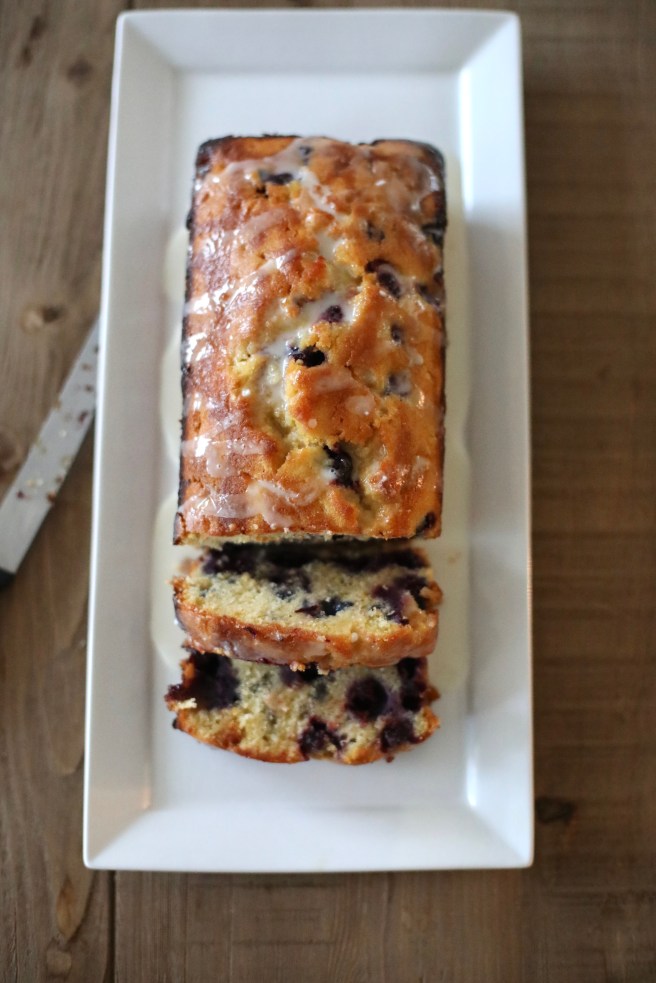
One night earlier this week, Chris came home and I came undone: I was exhausted.  It is time for summer, sunshine and a long break, I told him. The next morning my mom’s group was meeting and I was determined to bring something: I may not be able to control the weather, if my children are sick, how many more loads of laundry we have left, the TRAFFIC – oh man, the traffic is so terrible around here that it’s soul crushing…. but I can make a pretty great Lemon Blueberry Bread to turn my mood right side up again, and that alone is something worth celebrating.  I pulled out the last few lemons our sweet neighbor gave us a few weeks back at the start of February (whose lemon tree produces 20+ pounds of lemons in the dead of winter!?) and the pack of blueberries I’d randomly bought at the store last weekend and set to work.

Recipe originally from Home Baked Comfort by Kim Laidlaw

INGREDIENTS:

For the Bread:

  • 1 1/2 cups all purpose flour
  • 1 tsp baking powder
  • 1/2 tsp salt
  • 1/2 cup unsalted butter, room temperature
  • 3/4 cup granulated sugar
  • 1 tbsp grated lemon zest
  • 3 large eggs
  • 1/2  cup whole milk
  • 1 tsp vanilla extract
  • 1 cup fresh blueberries

For the Syrup:

  • 3 tbsp fresh lemon juice
  • 3 tbsp granulated sugar

For the Glaze:

  • 1/2 cup confectioner’s sugar
  • 3 tsp fresh lemon juice

INSTRUCTIONS:

  1. Preheat oven to 350. Butter and flour a 9×5 inch loaf pan.
  2. In a bowl, sift the flour, baking powder, and salt. Set aside.
  3. In your stand mixer or large bowl with a hand mixer, beat the butter, granulated sugar, and lemon zest on medium-high speed until light and soft. About 3 minutes.
  4. Add the eggs, one at a time until fully incorporated.
  5. Add the milk and vanilla extract, and mix fully together.
  6. Slowly add the dry ingredients, and stir until just blended. Fold in the blueberries.
  7. Scrape into the loaf pan, and place in oven. Bake for about 50 minutes – I check it around 45 minutes and take it out around 50-51 minutes, when a toothpick inserted in the center comes out clean.
  8. Take it out of the oven, let it cool and then turn onto a plate.
  9. While the bread is in the oven, make the syrup:
    1. In a small saucepan, boil the lemon juice and granulated sugar over medium heat until syrupy.  It will bubble up and get syrupy after about 2-3 minutes. Remove from heat.
    1. Using a wooden skewer (or toothpick), pierce the top, sides, and bottom of the bread.  Brush, or I typically pour, the syrup all over the bread. It’ll ooze into the pierced parts and be amazing, I promise.
  10. Make the glaze: in a small bowl, stir the confectioners’ sugar and lemon juice. Drizzle over the top of the bread once it’s completely cool.

NOTES:

  • The recipe states to toss the blueberries in a small bowl with a teaspoon of flour  before folding into the batter.  The idea is that this prevents the blueberries from sinking to the bottom of the loaf pan while it’s baking. I don’t do this.  I’ve done it a couple of times and found that: (1) it doesn’t serve it’s purpose and (2) it’s more work and clean up.

Cheers!

It’s All About the Guac!

fullsizeoutput_28a9

All I need in life is good guacamole and a strong margarita.  Sure, I would miss chocolate, tacos, and coffee, but I don’t think I could survive off just those things.  However, guacamole and margaritas could sustain me forever.

In case you live in a hole, it’s Cinco de Mayo tomorrow. I used to assume this was Mexico’s Independence Day, but according to Wikipedia the date, “commemorate(s) the Mexican Army’s difficult victory over the French Empire at the Battle of Puebla”.  While their Independence from Spain is celebrated September 16th.

For me, I’m grateful it means I get to enjoy some good Mexican food! I was in elementary school – maybe 4th grade – when I first tried Mexican food with one of my best friends that year.  Her mom picked us up after school and took as to Taco Bell a couple of blocks away.  I know, Taco Bell, sounds questionable.  I was mortified at the time: I’d never eaten a taco or burrito, or any of these things on the menu.  I decided I’d order whatever she had and just eat it. She ordered two, I ordered one. After I was done I wished I had ordered two like she had.  It was so good I started asking my mom to take me to Taco Bell.

I suppose that’s how my love for Mexican food started: through positive peer pressure to eat a bean and cheese burrito in the 4th grade.

My love for guacamole (and avocados) came a little later in life during my college years.  But it was like meeting my food soul mate if you will.  It was while devouring a bowl of guacamole and chips that it first crossed my mind that I could, maybe, in some crazy crazy way be pregnant with our first over 6 years ago. It’s what I ate the most of while I was pregnant with him and later our daughter, along with all forms of chocolate and avocados in general.  Guac is our jam around here.  Sometimes we just mash some avocado, add a little salt, a splash of lime or lemon or both.  Sometimes we mash it and add a few spoonfuls of our favorite salsa.  Sometimes we make it this way:

fullsizeoutput_28a5

INGREDIENTS:

  • 3 large avocados
  • 1/4 cup of finely diced red onion
  • 1 medium tomato, about half a cup, diced.
  • juice of 1 lemon
  • 1/4 cup of chopped cilantro
  • salt to taste, I used 1/2 teaspoon

INSTRUCTIONS:

  1. Cut the avocados in half, remove the seed. Scoop out the avocado flesh into a medium sized bowl. Or a molcajete, as I used in the pictures.
  2. Mash with a fork or pestle.  I like to leave a few chunky bits, it doesn’t have to be completely smooth.
  3. Add salt and lemon juice. I prefer to add the lemon juice immediately, because the acid from the lemon juice will keep the green avocado flesh from turning brown too quickly.
  4. Add the red onion, tomato, and cilantro and stir together until fully mixed.
  5. Enjoy with your favorite chips!

NOTES:

  • Typically, I try not to store my guacamole in the fridge for more than 20 minutes before serving.  However, if you must store it, whether for 20 minutes or an hour, make sure you put plastic wrap right on the guacamole to cover it. If the plastic wrap is touching all the guacamole and pressed onto it, it will prevent air from reaching the guacamole. If air reaches the guacamole it causes oxidation and the guacamole to brown.
  • Guacamole is based on preference, so feel free to add a pinch of lime juice, chili, green onion, more tomato, etc. … in the summertime I love to add a little corn to my guacamole.  Delicious!

IMG_6527

IMG_6522

fullsizeoutput_28aafullsizeoutput_289a

Cheers!

SaveSave

One Bowl Blueberry Muffins

IMG_6172

This is a recipe that I am going to commit to memory. It’s that good and that simple! One of my kids has been inhaling blueberries these last couple of weeks, to the point where I just can’t buy enough of them.  However, this week either she slowed down eating them or I bought too many because I found myself with a couple extra packs and somewhat unsure what to do with them. For a while I contemplated blueberry scones — my very very favorite blueberry scones, but that requires dusting the countertop with flour, using super cold butter, etc… etc… and to be frank: too big of a mess; too much of a hassle.

I’ve been pouring over the recipes in Deb Perelman’s book Smitten Kitchen Every Day since I got it around Christmas time and when I turned to these muffins yesterday I knew I had to make them ASAP! No fussy ingredients, one bowl, add the ingredients, mix it up, bake, enjoy… and easy clean up! To be honest, no one likes doing dishes. Especially on a weekend morning. So do yourself a favor and whip these up — you’ll be so happy you did!

IMG_6176

INGREDIENTS:

5 tablespoons unsalted butter

1/2 c. granulated sugar

finely grated zest from half a lemon (I zested a whole, you should too)

3/4 c. sour cream

1 large egg, room temperature

1 1/2 tsps baking powder

1/4 tsp baking soda

1/4 tsp salt

1 1/2 c. all-purpose flour

1 1/2 c. fresh blueberries

3 tablespoons turbinado sugar, for dusting

INSTRUCTIONS:

  1. Heat oven to 375. Line a muffin tin with 9 liners, or do as I do, and butter the muffin tin and then dust with flour, the good old fashion way.
  2. In a large, microwave safe bowl, melt the butter – about a minute and a half in the microwave.
  3. Add the sugar, lemon zest, sour cream, egg and whisk until smooth.
  4. Add the baking powder, baking soda, and salt.  Whisk until fully incorporated.
  5. Add the flour and blueberries.  With a wooden spoon or rubber spatula, gently fold in the flour and blueberries to the batter.
  6. The batter will be thick and smell delicious.  Go ahead, taste a little 😉 Divide the dough into the 9 prepared muffin cups and sprinkle a generous amount of turbinado sugar on top of each muffin.
  7. Bake for 25 minutes, then let cook for 10 minutes and enjoy!!

IMG_6181

IMG_6187

cheers!

Raspberry Chocolate Souffles


fullsizeoutput_2599

These delicious little souffles deflated faster than the camera could go “click!” by the time they were ready for their close up.  It was rather sad, but such is life.  Gotta take hold of the reigns before they fly past: life stops for no one and we always have to keep pressing forward. So press forward I did, and here we are with a delicious and surprisingly easy dessert!

Saturday night Chris went to the SMC/Gonzaga game at our alma mater (and also where we got married!) so I made these for the kids and I to enjoy as a consolation.  To be honest, we might have devoured these before dinner.  Oops! On another note, I made a couple of these without raspberries, and I must say they are not nearly as good without the raspberries! The great thing about souffle is that you can prepare the batter and pour  into the ramekins the day before, because it will keep in the fridge overnight.  This saves a lot of time, and breaks up the work quite nicely.

Don’t forget: if you’re going to put a cute, little powdered sugar heart or other design on top make sure your stencil and powdered sugar are ready to go as soon as they come out of the oven – the longer it takes for you to serve these babies the more likely they’ll deflate before they make it to the table!  A lesson learned for next time.  😉

IMG_6076

IMG_6079

fullsizeoutput_2597

INGREDIENTS:

*recipe from William Sonoma’s book Home Baked Comfort

  • 7 tbsp granulated sugar, plus more for dusting the ramekins
  • 6 oz package of raspberries
  • 3 tbsp unsalted butter
  • 6 oz bittersweet chocolate, chopped.  I highly suggest using a high quality chocolate! It makes all the difference for this decadent, chocolate based dessert.
  • 1/2 tsp vanilla extract
  • 5 large eggs, separated plus 2 egg whites
  • pinch of salt – about a 1/4 tsp
  • 1/4 tsp cream of tartar
  • confectioners’ sugar for dustin

INSTRUCTIONS:

  1. Place rack in lower third of the oven and preheat to 375F.
  2. The recipe calls for six 1-cup ramekins, but I found the recipe made 8.  Hence, butter 8 ramekins and lightly dust each with granulated sugar.
  3. In a small bowl toss the raspberries with a tablespoon of the sugar and divide among the ramekins.
  4. In a small saucepan, melt the butter and chocolate over low heat, stirring as you go.  Don’t let the chocolate burn. Remove from heat and stir in the vanilla.
  5. In your mixer, with the whip attachment, beat the egg yolks and 3 tablespoons of the sugar on medium speed until it’s thickened. Fold the chocolate mixture in.
  6. In a large bowl with a hand mixer, beat the egg whites, salt, and cream of tartar on medium-high speed.  When the egg whites are getting fluffy, add the remaining 3 tablespoons of granulated sugar and beat until you have thick, stiff egg white peaks.
  7. Fold the beaten egg whites into the chocolate mixture.  Divide the mixture evenly among the ramekins.
  8. Place on a rimmed baking sheet and bake until they are set and puffed, about 18, but not more than 20 minutes.
  9. Dust with powdered sugar, and enjoy before they fall!

fullsizeoutput_2595fullsizeoutput_259afullsizeoutput_2596

cheers! and Happy Valentine’s Day ♥

SaveSave

New Years in Argentina!

picture_new

I truly can’t believe it’s already February?!  We’re 1/12 of the way through the year, and I must say it’s been a really fun, adventurous, and exciting year so far. To kick off the new year we celebrated with friends in Patagonia.  Specifically, we stayed with family friends who have a fly fishing lodge in Esquel, Argentina.  It was one of the most beautiful places I’d been in years.

While we were there I kept thinking I was in the movie The Sound of Music, and found myself waiting for everyone to break out into song and dance: “a doe! a deer! a female deer, rain, a drop of golden sun…” while that never happened, I couldn’t stop playing the movie over and over in my head.  Maria, played by Julie Andrews, says in the movie: “the skies were so blue today, and everything was so green, I just had to be a part of it.” This is exactly what it felt like to be there.  Kids climbing trees, picking strawberries and raspberries and cherries right off the trees, running outside all day, riding bikes, swimming, I could go on…

We let the kids go kayaking in the river one afternoon, and I couldn’t help but remember that scene in the movie where the children and Maria are in their canoes heading back home and they all fall in the water while their Father watches –  although my kids never fell in I think these pictures give a glimpse of what I’m talking about! If you couldn’t already tell The Sound of Music is one of my all time favorite films.  😉

After we left our friends’ place, we continued to Villa La Angostura which is closer to Bariloche, also in Patagonia.  We stayed in a gorgeous home turned hotel that I didn’t want to leave, and that I now can’t wait to go back to one day! It was a truly incredible trip that I’m grateful we got to do as a family.

During this trip we didn’t have internet connection of any kind whatsoever for 3 or 4 days straight. I can’t explain how incredibly freeing it was to be forced to disconnect in that way.  We couldn’t check e-mail, there was no “let me Google that!” during dinner conversations…anything. Not even texting.  As a result, since coming home, I spend less time online, less time thinking about e-mail, social media, surfing the web to browse this and that. I find that it allows me to play more, have more fun, and be more present, for lack of a better word.  … things to think about, I suppose.

cheers! and happy belated New Year! 😉