Brownies: always fudgy, never cakey


fullsizeoutput_31ba

Over the course of the last couple of years I’ve made a few different types of homemade brownies. However, they never turned out as well as boxed brownies! They were either too fudgy, too cakey, or didn’t hold up because they were too crumbly, etc.  I had basically given up on homemade brownies.

However, when we decided brownies should be our main Easter dessert this year, complete with berries and ice cream, I was determined to make them from scratch.  Que Sally’s Baking Addiction! I must say, she is one of two or three food bloggers whose recipes have never failed me. I quickly decided on these fudgy brownies, because I believe brownies should always be rich and fudgy! Don’t you? Otherwise, make a chocolate cake.

In the weeks since making these, I find myself craving them.  Not boxed brownies, but these specific brownies!  Alas, in my attempt to solve a problem (no more boxed brownies) I have created a new problem because making these, which I now crave over and beyond boxed brownies, does require a little bit more of an effort and mess.  But they are worth every effort! And honesty, the effort to make them is minimal… it’s cleaning the dishes I struggle with the most these days, just ask my husband 😉

fullsizeoutput_31b8fullsizeoutput_31c0fullsizeoutput_31c3

cheers!

Lemon-Blueberry Bread to Fight the Winter Blues

It’s been particularly rainy, cold, and windy here in the Bay Area. Normally this doesn’t bother me, as I love fall and winter and relish in this weather. However, this year I wouldn’t mind speeding up the process a bit as the thought of spring and summer sound exceptionally wonderful.

One night earlier this week, Chris came home and I came undone: I was exhausted.  It is time for summer, sunshine and a long break, I told him. The next morning my mom’s group was meeting and I was determined to bring something: I may not be able to control the weather, if my children are sick, how many more loads of laundry we have left, the TRAFFIC – oh man, the traffic is so terrible around here that it’s soul crushing…. but I can make a pretty great Lemon Blueberry Bread to turn my mood right side up again, and that alone is something worth celebrating.  I pulled out the last few lemons our sweet neighbor gave us a few weeks back at the start of February (whose lemon tree produces 20+ pounds of lemons in the dead of winter!?) and the pack of blueberries I’d randomly bought at the store last weekend and set to work.

Recipe originally from Home Baked Comfort by Kim Laidlaw

INGREDIENTS:

For the Bread:

  • 1 1/2 cups all purpose flour
  • 1 tsp baking powder
  • 1/2 tsp salt
  • 1/2 cup unsalted butter, room temperature
  • 3/4 cup granulated sugar
  • 1 tbsp grated lemon zest
  • 3 large eggs
  • 1/2  cup whole milk
  • 1 tsp vanilla extract
  • 1 cup fresh blueberries

For the Syrup:

  • 3 tbsp fresh lemon juice
  • 3 tbsp granulated sugar

For the Glaze:

  • 1/2 cup confectioner’s sugar
  • 3 tsp fresh lemon juice

INSTRUCTIONS:

  1. Preheat oven to 350. Butter and flour a 9×5 inch loaf pan.
  2. In a bowl, sift the flour, baking powder, and salt. Set aside.
  3. In your stand mixer or large bowl with a hand mixer, beat the butter, granulated sugar, and lemon zest on medium-high speed until light and soft. About 3 minutes.
  4. Add the eggs, one at a time until fully incorporated.
  5. Add the milk and vanilla extract, and mix fully together.
  6. Slowly add the dry ingredients, and stir until just blended. Fold in the blueberries.
  7. Scrape into the loaf pan, and place in oven. Bake for about 50 minutes – I check it around 45 minutes and take it out around 50-51 minutes, when a toothpick inserted in the center comes out clean.
  8. Take it out of the oven, let it cool and then turn onto a plate.
  9. While the bread is in the oven, make the syrup:
    1. In a small saucepan, boil the lemon juice and granulated sugar over medium heat until syrupy.  It will bubble up and get syrupy after about 2-3 minutes. Remove from heat.
    1. Using a wooden skewer (or toothpick), pierce the top, sides, and bottom of the bread.  Brush, or I typically pour, the syrup all over the bread. It’ll ooze into the pierced parts and be amazing, I promise.
  10. Make the glaze: in a small bowl, stir the confectioners’ sugar and lemon juice. Drizzle over the top of the bread once it’s completely cool.

NOTES:

  • The recipe states to toss the blueberries in a small bowl with a teaspoon of flour  before folding into the batter.  The idea is that this prevents the blueberries from sinking to the bottom of the loaf pan while it’s baking. I don’t do this.  I’ve done it a couple of times and found that: (1) it doesn’t serve it’s purpose and (2) it’s more work and clean up.

Cheers!

PB Honey Toast, My Way

IMG_4541.JPGLately, I find myself so over “date night”.  Don’t get me wrong, I love an evening out with my husband and friends, but “date night” has so many connotations attached to it, both positive and negative. There’s the pressure to make reservations, get dressed, have dinner planned for the kids and the sitter, arrange a date and time that works for friends (if it’s a group)… And then, you risk the fact that your kids might still be awake when you get home later that evening!! At least, if your kids are anything like mine.  On the other hand, it feels so good to get dressed up, put on some heels, try a new restaurant, and catch up with your husband and friends over a bottle of wine and good food.

A couple of weeks ago, Chris and I were debating whether we should go out one night.  We wanted some kid-free time together, but we were also exhausted after a long week.  Has anyone else been there? Please tell me we’re not the only ones…

Jack happened to be with his grandparents watching his cousins’ soccer games, and Isabelle was home with us.  In an inspired moment, Chris had the brilliant beyond brilliant idea to ask our sweet H.S neighbor girl to come watch Isabelle so we could go out! During the day! Brilliant, no?! We’ve often gone out during the day, but always with an agenda or a list of errands to accomplish in X amount of time.  This time, we had NO agenda – just me and my hubs, and the best “day date”.  We even made it home in time to make dinner for the kids, and enjoy movie night with them! It was truly, an almost perfect day.

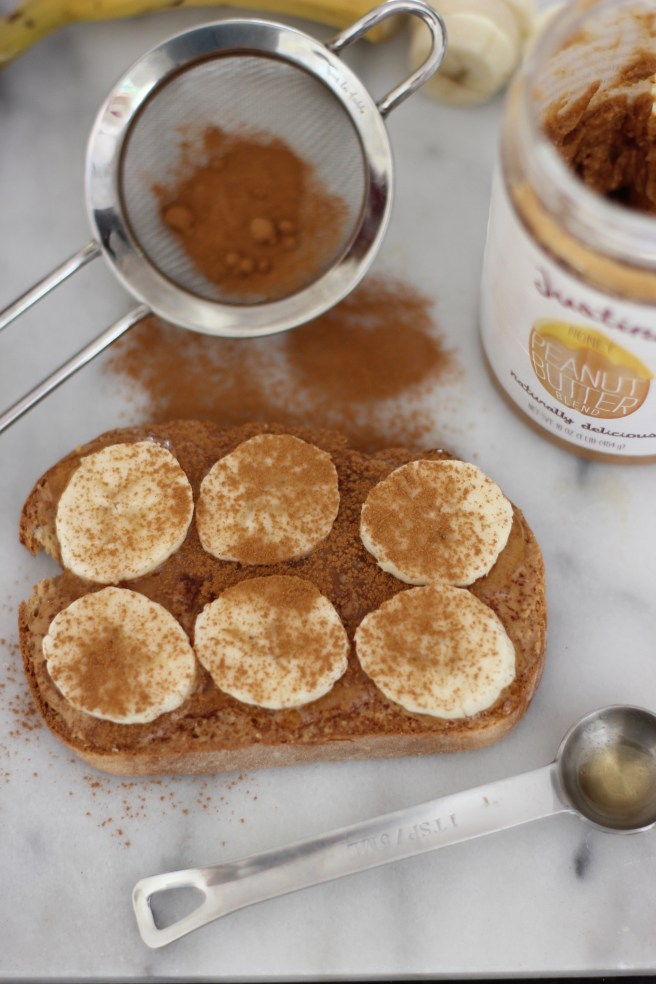
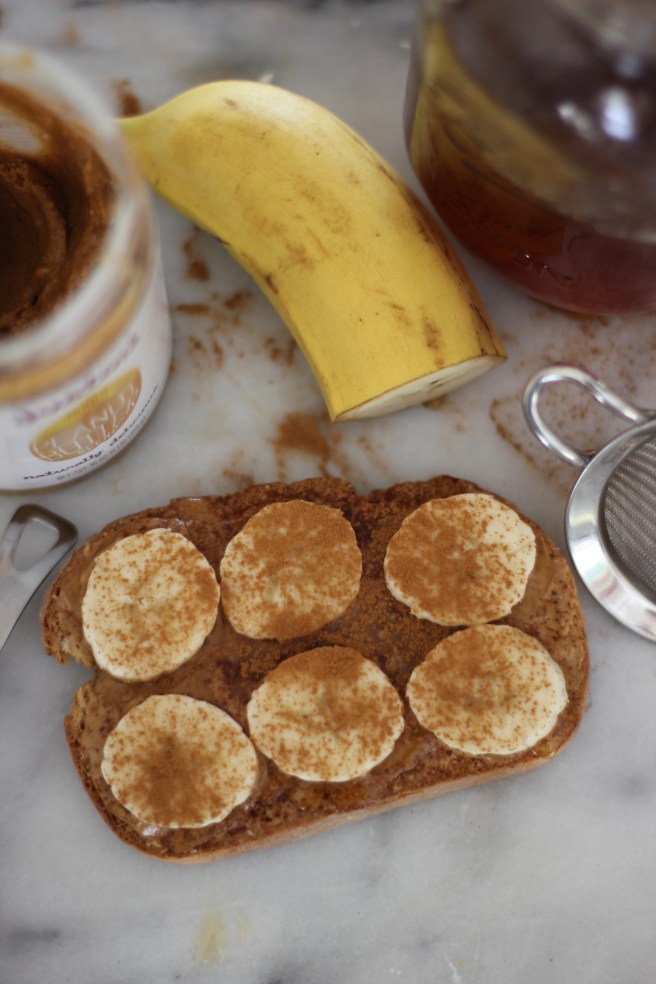
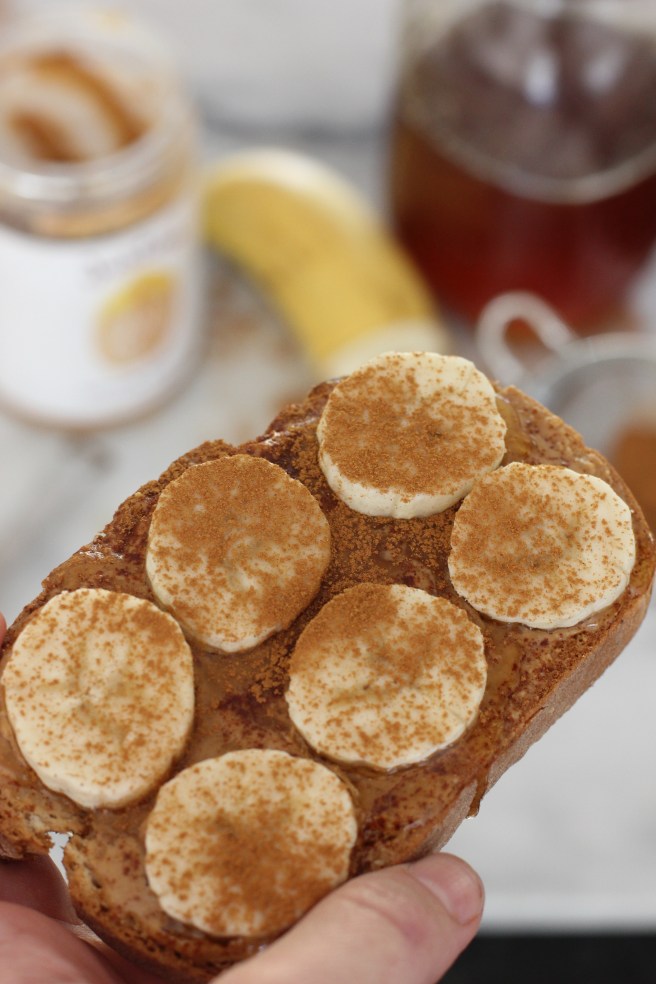
We ended up at Coffee Shop in Walnut Creek where Chris got the most phenomenal Peanut Butter + Honey Toast.  I haven’t quite been able to stop thinking about it, so this week I made my own homemade version, topped with a dusting of cinnamon. Simple, easy, filling, and nutritious! Thanks for the inspiration Coffee Shop!

fullsizeoutput_1a35

INGREDIENTS:

  • Toast, of choice.  I used Udi’s Whole Wheat Gluten Free Bread.
  • 1-2 tablespoons of peanut butter, I always prefer smooth PB, and think it works best with this snack.
  • 2-3 teaspoons of Honey
  • Banana, sliced.
  • Cinnamon for dusting.

INSTRUCTIONS:

  1. Toast bread.
  2. Spread a light amount of PB, about a tablespoon.
  3. Drizzle honey over the peanut butter, 2-3 teaspoons.
  4. Slice banana to cover the toast.
  5. Dust cinnamon on top!

Note: I especially love cinnamon for it’s ability to regulate blood sugar, lower cholesterol, any many other benefits.  Raw, local honey is amazing for its ability to relieve some allergies, and anti-viral and anti-bacterial properties.  In high school I would make myself a tea of hot water, honey, and cinnamon.  It was so good! Perhaps I’ll share the recipe one day…

I have had this for a light lunch numerous times this week, it’s that good and filling!

fullsizeoutput_1a37

IMG_4581

cheers!


SaveSaveSaveSave

My Go-To Gluten Free Chocolate Chip Cookies

IMG_2686

I’ve shared Displaced Housewife’s, Chocolate Chip Pumpkin Spice Cookies before, here.  Today, I’m sharing her Gluten Free Chocolate Chip Cookies.  Like she says, they really are the best gluten free CCC’s ever.  You won’t need another gluten free cookie recipe after this one, trust me.  We’ve made these, over a handful of times now for all types of occasions and they never disappoint.  I plan to make them again this week for one of Jack’s preschool events.  In this world, with ever increasing food allergies and sensitivities it’s nice to have a reliable, delicious recipe that I know will satisfy both kids and adults who are gluten-free.

My favorite thing about these is that they have that slightly crunchy exterior and chewy chocolatey interior – which makes for the perfect cookie, in my opinion. 🙂

Also, don’t skimp on chilling the dough.  It makes all the difference between a “blah-whatever-it’s okay-cookie”, and a “wow, that’s a really good cookie!”  When I take the time to chill the dough my husband always says “these are really good” with those raised eyebrows, head bopping up and down happily.  However, when I don’t take the time to chill the dough, they’re a boring “eh” no excitement whatsoever…. so: chill yo’ dough!

IMG_2684

IMG_2682

IMG_2659

IMG_2678

INGREDIENTS

  • 1 stick, 4 ounces, unsalted butter
  • 1 1/4 cup light brown sugar, packed tight
  • 1/3 cup sunflower seed oil
  • 1/4 cup granulated sugar
  • 2 large eggs
  • 2 tablespoons milk
  • 1 tablespoon vanilla extract
  • 3 cups gluten-free flour (I’ve always used cup4cup)
  • 2 teaspoon baking powder
  • 1 1/2teaspoon baking soda
  • 1 teaspoon salt
  • 2 1/2 cups semi-sweet chocolate chips

INSTRUCTIONS

  1. Put the stick of unsalted butter in a small sauce pan and melt over medium-high heat. Once the butter is melted, continue to stir, and watch the butter as it starts to crackle and pop.  Little golden bits will settle into the bottom of the pan, and over the course of a couple of minutes stop crackling and popping.  This is the sign that your butter is done browning and you can turn the stove off, and remove the pan from heat. Transfer into a medium heat proof bowl and let cool.
  2. Add the sunflower seed oil, brown sugar, granulated sugar, eggs, milk and vanilla to the browned butter. Whisk together until entirely incorporated.
  3. In another medium bowl, whisk the gluten-free flour, baking powder, baking soda and salt.
  4. Add the flour mixture to the brown butter mixture and mix together. Add the chocolate chips.
  5. Pick up all the cookie dough and put it on top of plastic saran wrap, and wrap it up! Put in the fridge for a couple of hours, or even overnight!
  6. To bake, heat the oven to 375.
  7. Roll little balls of dough, all roughly the same size, and place onto a baking sheet (lined with parchment paper). Bake for about 12 minutes.
  8. When done baking, cookies are slightly browned around the edges and tops, remove from oven and let cool completely!
  9. ENJOY!

IMG_2665

cheers!

An Easter Carrot Cake for Beginners

IMG_3251

Easter is always my favorite holiday. Christmas is wonderful and special, and has so much anticipation built up to it that makes for so much fun and excitement. However, because it’s couched between Thanksgiving, New Years, and the general holiday craze, it can be a bit overwhelming with so much activity.  But, not Easter! Instead, Easter has a quiet start with the beginning of Lent on Ash Wednesday and slowly builds up with the coming of Spring, before Easter Sunday.

Chris volunteered me to bring carrot cake for Easter dinner this year.  I was more than happy to oblige because I love any excuse to bake 😉 In our home carrot cake season starts in February when Chris requests it as his birthday cake – it’s his favorite so I’m making it my duty to find (or create) the most perfect carrot cake recipe in the world.  If you have one, feel free to send it my way.  So far, this recipe is as close as we’ve gotten.  I’ve made it a handful of times now and it comes out moist and delicious every time — even when I think “uh oh, this time it’s going to fail me” it doesn’t! It’s a great cake for every spring occasion: bridal showers, baby showers, engagement parties, dinner parties, baptisms etc…

I call it a “beginners” carrot cake because I have actually memorized this recipe – that’s how easy it is! It’s a one bowl recipe.  Mix the oil and sugar, add the eggs, sift in the flour, baking powder, baking soda, salt, nutmeg, cinnamon, add the grated carrots, raisins, pecans – and boom you’re done! …. well, after it spends almost an hour in the oven.  🙂

fullsizeoutput_15e6

INGREDIENTS:                                                                                                                         *Recipe adapted from What’s Gaby Cooking Layered Carrot Cake with Cream Cheese Frosting

  • 2 cups sugar
  • 1 1/2 cups vegetable oil
  • 4 large eggs at room temperature
  • 2 cups all purpose flour
  • 2 teaspoons baking powder
  • 2 teaspoons baking soda
  • 1 teaspoon salt
  • 1 teaspoon ground cinnamon
  • 1 teaspoon ground nutmeg
  • 3 cups finely grated and peeled carrots – I peel them and then place in my mini Cuisinart food processor to grind.  I use my mini food processor more than I ever would have imagined, it’s one of my favorites.
  • 3/4 cup raisins
  • 3/4 cup chopped pecans
  • 4 cups powdered sugar
  • 2 8oz packages of cream cheese at room temperature
  • 1 stick (1/2 cup) unsalted butter at room temperature
  • 4 teaspoons vanilla extract

INSTRUCTIONS:

  1. Preheat oven to 325F.  Grease 2 8inch round cake pans.
  2. Using a stand mixer, or large bowl and hand mixer, beat the sugar and vegetable oil until thoroughly combined.  Add the eggs 1 at a time.  I make sure each egg has been entirely mixed in before adding the next.  It only takes a few seconds for each egg.
  3. Sift in the flour, baking powder, baking soda, salt, cinnamon and nutmeg into the sugar/oil/egg mixture.  I place this strainer over my stand mixer and put all the dry ingredients into the strainer to “sift” through to the sugar/oil/egg mixture.  Stir in the carrots, raisins, and pecans.
  4. Pour the batter into the prepared pans.  Try to divid the batter equally between both pans! Bake about 50-55 minutes until a toothpick inserted into the center of the cake comes out clean.  Let cakes cool completely before frosting.
  5. To make the frosting: use either the wire whip attachment on your stand mixer, or a handheld mixer, and whip together the powdered sugar, cream cheese, butter, and vanilla extract until it is creamy and smooth.
  6. Put one cake layer on a cake plate and spread with frosting.  Then put the other cake on top and spread with frosting.  Enjoy!

IMG_3252

fullsizeoutput_1523

fullsizeoutput_1520fullsizeoutput_1524

Cheers!