Brownies: always fudgy, never cakey


fullsizeoutput_31ba

Over the course of the last couple of years I’ve made a few different types of homemade brownies. However, they never turned out as well as boxed brownies! They were either too fudgy, too cakey, or didn’t hold up because they were too crumbly, etc.  I had basically given up on homemade brownies.

However, when we decided brownies should be our main Easter dessert this year, complete with berries and ice cream, I was determined to make them from scratch.  Que Sally’s Baking Addiction! I must say, she is one of two or three food bloggers whose recipes have never failed me. I quickly decided on these fudgy brownies, because I believe brownies should always be rich and fudgy! Don’t you? Otherwise, make a chocolate cake.

In the weeks since making these, I find myself craving them.  Not boxed brownies, but these specific brownies!  Alas, in my attempt to solve a problem (no more boxed brownies) I have created a new problem because making these, which I now crave over and beyond boxed brownies, does require a little bit more of an effort and mess.  But they are worth every effort! And honesty, the effort to make them is minimal… it’s cleaning the dishes I struggle with the most these days, just ask my husband 😉

fullsizeoutput_31b8fullsizeoutput_31c0fullsizeoutput_31c3

cheers!

Lemon-Blueberry Bread to Fight the Winter Blues

It’s been particularly rainy, cold, and windy here in the Bay Area. Normally this doesn’t bother me, as I love fall and winter and relish in this weather. However, this year I wouldn’t mind speeding up the process a bit as the thought of spring and summer sound exceptionally wonderful.

One night earlier this week, Chris came home and I came undone: I was exhausted.  It is time for summer, sunshine and a long break, I told him. The next morning my mom’s group was meeting and I was determined to bring something: I may not be able to control the weather, if my children are sick, how many more loads of laundry we have left, the TRAFFIC – oh man, the traffic is so terrible around here that it’s soul crushing…. but I can make a pretty great Lemon Blueberry Bread to turn my mood right side up again, and that alone is something worth celebrating.  I pulled out the last few lemons our sweet neighbor gave us a few weeks back at the start of February (whose lemon tree produces 20+ pounds of lemons in the dead of winter!?) and the pack of blueberries I’d randomly bought at the store last weekend and set to work.

Recipe originally from Home Baked Comfort by Kim Laidlaw

INGREDIENTS:

For the Bread:

  • 1 1/2 cups all purpose flour
  • 1 tsp baking powder
  • 1/2 tsp salt
  • 1/2 cup unsalted butter, room temperature
  • 3/4 cup granulated sugar
  • 1 tbsp grated lemon zest
  • 3 large eggs
  • 1/2  cup whole milk
  • 1 tsp vanilla extract
  • 1 cup fresh blueberries

For the Syrup:

  • 3 tbsp fresh lemon juice
  • 3 tbsp granulated sugar

For the Glaze:

  • 1/2 cup confectioner’s sugar
  • 3 tsp fresh lemon juice

INSTRUCTIONS:

  1. Preheat oven to 350. Butter and flour a 9×5 inch loaf pan.
  2. In a bowl, sift the flour, baking powder, and salt. Set aside.
  3. In your stand mixer or large bowl with a hand mixer, beat the butter, granulated sugar, and lemon zest on medium-high speed until light and soft. About 3 minutes.
  4. Add the eggs, one at a time until fully incorporated.
  5. Add the milk and vanilla extract, and mix fully together.
  6. Slowly add the dry ingredients, and stir until just blended. Fold in the blueberries.
  7. Scrape into the loaf pan, and place in oven. Bake for about 50 minutes – I check it around 45 minutes and take it out around 50-51 minutes, when a toothpick inserted in the center comes out clean.
  8. Take it out of the oven, let it cool and then turn onto a plate.
  9. While the bread is in the oven, make the syrup:
    1. In a small saucepan, boil the lemon juice and granulated sugar over medium heat until syrupy.  It will bubble up and get syrupy after about 2-3 minutes. Remove from heat.
    1. Using a wooden skewer (or toothpick), pierce the top, sides, and bottom of the bread.  Brush, or I typically pour, the syrup all over the bread. It’ll ooze into the pierced parts and be amazing, I promise.
  10. Make the glaze: in a small bowl, stir the confectioners’ sugar and lemon juice. Drizzle over the top of the bread once it’s completely cool.

NOTES:

  • The recipe states to toss the blueberries in a small bowl with a teaspoon of flour  before folding into the batter.  The idea is that this prevents the blueberries from sinking to the bottom of the loaf pan while it’s baking. I don’t do this.  I’ve done it a couple of times and found that: (1) it doesn’t serve it’s purpose and (2) it’s more work and clean up.

Cheers!

An Easter Carrot Cake for Beginners

IMG_3251

Easter is always my favorite holiday. Christmas is wonderful and special, and has so much anticipation built up to it that makes for so much fun and excitement. However, because it’s couched between Thanksgiving, New Years, and the general holiday craze, it can be a bit overwhelming with so much activity.  But, not Easter! Instead, Easter has a quiet start with the beginning of Lent on Ash Wednesday and slowly builds up with the coming of Spring, before Easter Sunday.

Chris volunteered me to bring carrot cake for Easter dinner this year.  I was more than happy to oblige because I love any excuse to bake 😉 In our home carrot cake season starts in February when Chris requests it as his birthday cake – it’s his favorite so I’m making it my duty to find (or create) the most perfect carrot cake recipe in the world.  If you have one, feel free to send it my way.  So far, this recipe is as close as we’ve gotten.  I’ve made it a handful of times now and it comes out moist and delicious every time — even when I think “uh oh, this time it’s going to fail me” it doesn’t! It’s a great cake for every spring occasion: bridal showers, baby showers, engagement parties, dinner parties, baptisms etc…

I call it a “beginners” carrot cake because I have actually memorized this recipe – that’s how easy it is! It’s a one bowl recipe.  Mix the oil and sugar, add the eggs, sift in the flour, baking powder, baking soda, salt, nutmeg, cinnamon, add the grated carrots, raisins, pecans – and boom you’re done! …. well, after it spends almost an hour in the oven.  🙂

fullsizeoutput_15e6

INGREDIENTS:                                                                                                                         *Recipe adapted from What’s Gaby Cooking Layered Carrot Cake with Cream Cheese Frosting

  • 2 cups sugar
  • 1 1/2 cups vegetable oil
  • 4 large eggs at room temperature
  • 2 cups all purpose flour
  • 2 teaspoons baking powder
  • 2 teaspoons baking soda
  • 1 teaspoon salt
  • 1 teaspoon ground cinnamon
  • 1 teaspoon ground nutmeg
  • 3 cups finely grated and peeled carrots – I peel them and then place in my mini Cuisinart food processor to grind.  I use my mini food processor more than I ever would have imagined, it’s one of my favorites.
  • 3/4 cup raisins
  • 3/4 cup chopped pecans
  • 4 cups powdered sugar
  • 2 8oz packages of cream cheese at room temperature
  • 1 stick (1/2 cup) unsalted butter at room temperature
  • 4 teaspoons vanilla extract

INSTRUCTIONS:

  1. Preheat oven to 325F.  Grease 2 8inch round cake pans.
  2. Using a stand mixer, or large bowl and hand mixer, beat the sugar and vegetable oil until thoroughly combined.  Add the eggs 1 at a time.  I make sure each egg has been entirely mixed in before adding the next.  It only takes a few seconds for each egg.
  3. Sift in the flour, baking powder, baking soda, salt, cinnamon and nutmeg into the sugar/oil/egg mixture.  I place this strainer over my stand mixer and put all the dry ingredients into the strainer to “sift” through to the sugar/oil/egg mixture.  Stir in the carrots, raisins, and pecans.
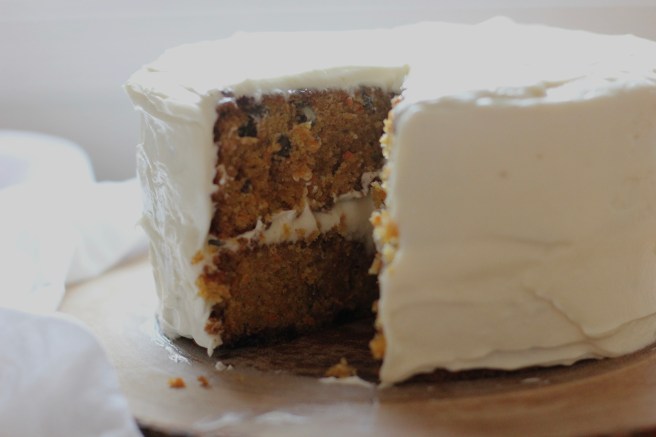
  4. Pour the batter into the prepared pans.  Try to divid the batter equally between both pans! Bake about 50-55 minutes until a toothpick inserted into the center of the cake comes out clean.  Let cakes cool completely before frosting.
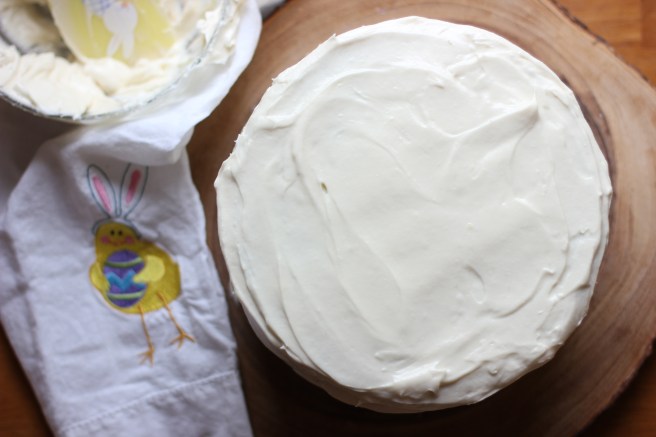
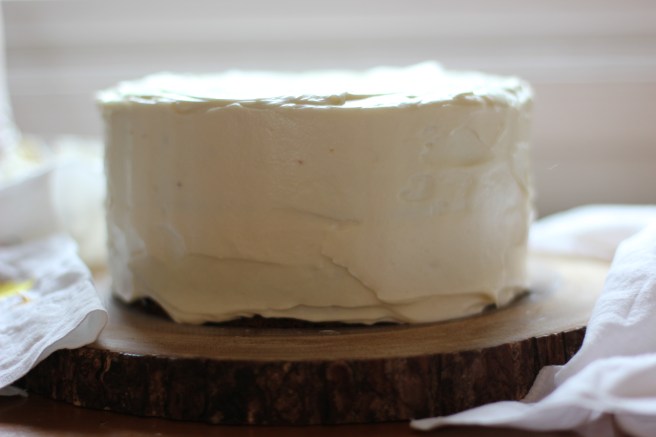
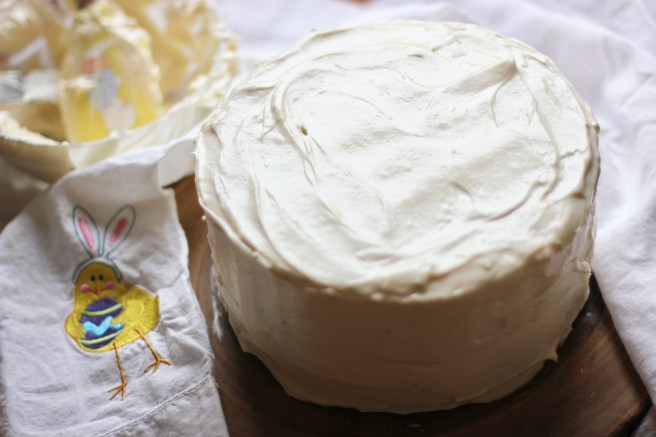
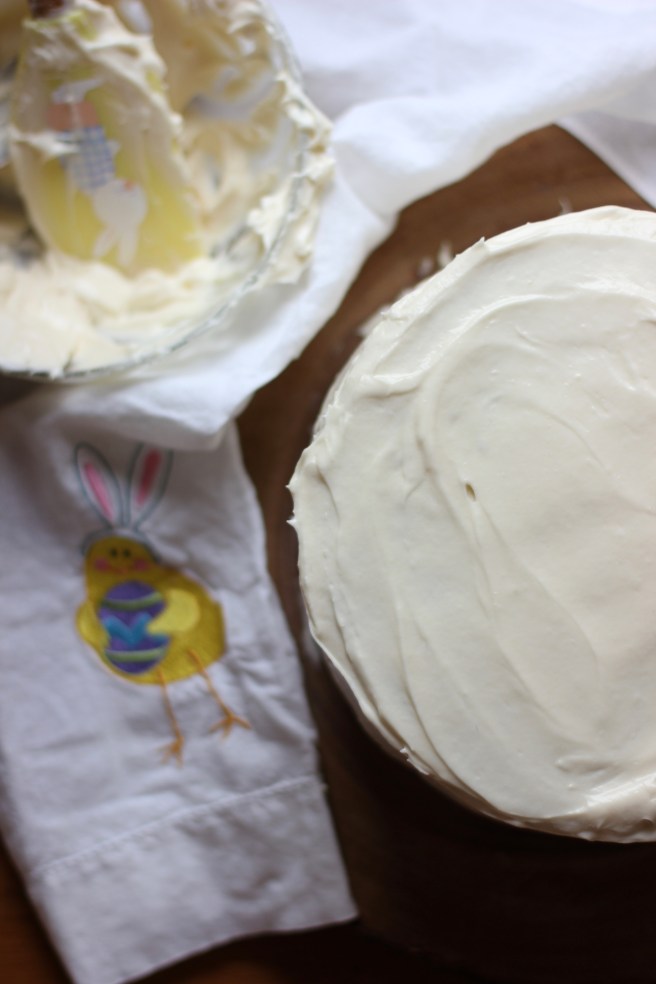
  5. To make the frosting: use either the wire whip attachment on your stand mixer, or a handheld mixer, and whip together the powdered sugar, cream cheese, butter, and vanilla extract until it is creamy and smooth.
  6. Put one cake layer on a cake plate and spread with frosting.  Then put the other cake on top and spread with frosting.  Enjoy!

IMG_3252

fullsizeoutput_1523

fullsizeoutput_1520fullsizeoutput_1524

Cheers!